Why HTTPS?
This is just a static blog and personal website. Why? The better question is – why not?
In the wake of security disclosures like Meltdown and Spectre we should all be thinking of ways to improve security, whenever and wherever possible. That said, there are many reasons to use HTTPS everywhere not to mention the fact that with initiatives like Let’s Encrypt it’s becoming easier (and cheaper) than ever. If you aren’t going to do it now, when will you?
Getting Started
Anyway, having thoroughly convinced you this is necessary, you may remember back in May of 2016 that I moved my website from GitHub pages to Amazon S3. That’s still its home, and probably will be for the foreseeable future.
Due to that it made sense to go with AWS Certificate Manager, rather than Let’s Encrypt for the certificate. I’ll walk through each of the steps I took to setup HTTPS for this website by using AWS Certificate Manager and CloudFront.
The main steps are:
- Use AWS Certificate Manager to obtain an SSL Certificate
- Verify ownership of your domain name by adding a CNAME entry
- Setup a CloudFront Distribution to point to your website’s S3 bucket
- Update your DNS to point to the CloudFront distribution URL
The steps above assume you already have a static S3 website with a custom domain and that you can manage your domain name’s DNS records.
Obtain the SSL Certificate
AWS Certificate Manager makes it easy to obtain an SSL certificate from a Certified Authority, in this case Amazon. They also take care to auto-renew the certificate and it’s free when you use it with other Amazon products.
To get started visit AWS Certificate
Manager in the
us-east-1 (N. Virginia) region❗ Region selection becomes important when we later setup
CloudFront, since it can only use Certificate Manager certificates you created in us-east-1. I ended
up having to redo this step when I got further along.
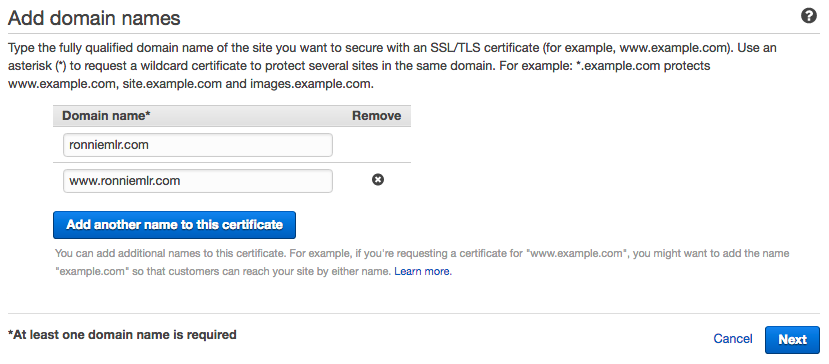
Click “Request a certificate” and you’ll be prompted to enter the domain name(s)
for your certificate. For this website I used ronniemlr.com and
www.ronniemlr.com.
Verify Domain Ownership
Next you have to prove to Amazon you own the domain name. You can do this with DNS verification or Email verification. I chose DNS verification, but email is probably even easier. With DNS verification Amazon gives you CNAME entries to add for each domain name variant you requested for the certificate.
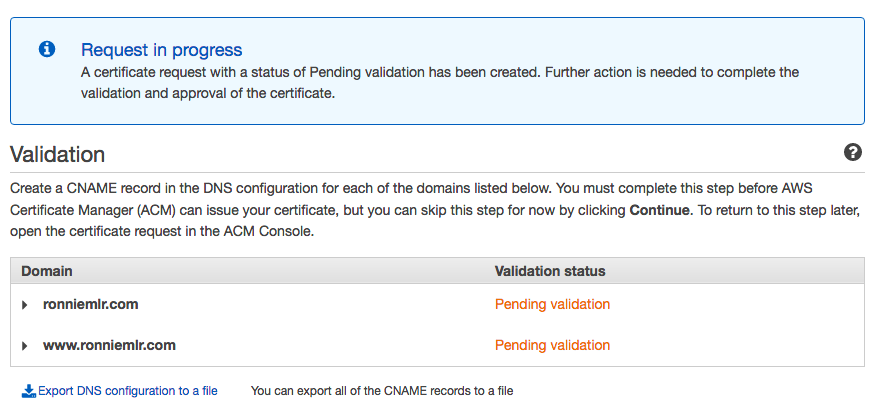
After you add the CNAME records to your domain name and wait a few minutes, the validation status will change from “Pending validation” to “Success” and you can proceed with the next step.
Setup CloudFront Distribution
The next thing you need to do is create a CloudFront web distribution. This will give you a CloudFront URL that will respond and serve traffic over HTTPS, once you configure it to do so.
Head over to the CloudFront dashboard and click “Create Distribution” then “Get Started” under the “Web” distribution type.
You’ll be prompted to select the Origin Domain Name. If you click the field it will list your available S3 buckets.❗ Don’t do this. This is another trap that I fell into. Because you’ve configured the bucket to be a static website host, S3 provides you with another URL. This is the URL you’ve probably used to point your custom domain name to your S3 website.
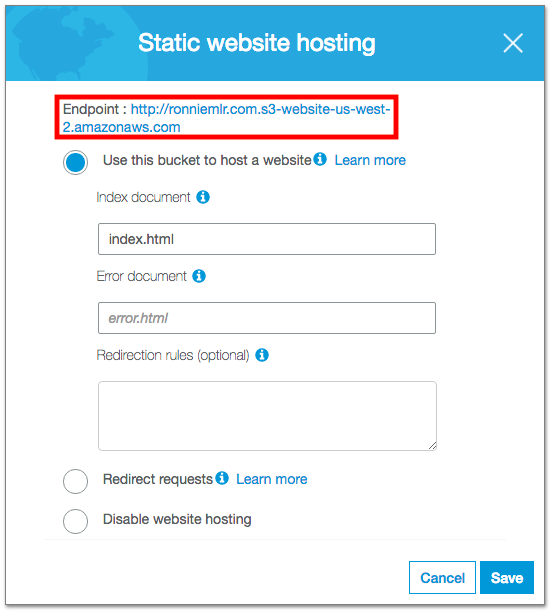
To find your S3 static website host URL, go to your website’s bucket in the S3 dashboard then click the properties tab, then the “Static website hosting” box.
If you just use the standard S3 URL suggested for you, your settings for “Index document” and “Error document” and others won’t be honored.
Distribution settings
Back in the CloudFront dashboard, you can leave the other settings for origin and caching as-is or set them up to your liking (I personally like to redirect non HTTP to HTTPS using “Viewer Protocol Policy”).
The most important distribution settings in particular are the SSL certificate and the SSL Client Support settings. Choose the “Custom SSL Certificate” option, then you should be able to choose the certificate manager certificate you created previously.
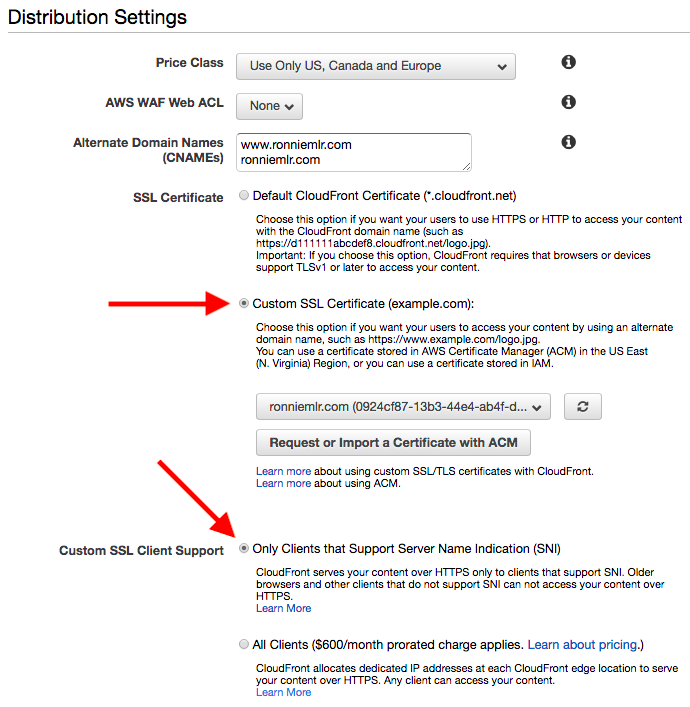
Be sure to choose the Only Clients That Support Server Name Indication (SNI) option. This is the free one. You can read more about SNI and its limitations, but essentially older clients (Internet Explorer on XP, Android 2.3 for example) won’t work.
When the alternative costs $600/mo for a dedicated IP address, I think I can live with those clients not viewing my website. If you run a mission critical operation or one with paying customers, you’re probably reading the wrong blog post!
Review your settings and click “Create Distribution”. After a few minutes your
distribution will be ready to use. However, you should already see the domain name
assigned to you. It will look something like this: dln7ue9x0nvom.cloudfront.net
Pointing your Domain to CloudFront
The final step is to point your custom domain name to the CloudFront distribution URL. The way I do this is by using an ALIAS record on my domain, swapping out the S3 static website URL for the CloudFront distribution URL:

Conclusion
I’ve been wanting to try Amazon Certificate Manager for a while now and I’m glad I got around to doing so. I was pleasantly surprised with how easy it was to setup and get an SSL certificate issued. I didn’t touch a single openssl command and not a single certificate signing request was harmed in the making of this blog post. Feels like a win.